you need to know about how to use the Cricut Foil Transfer Kit.
I did a test on Smart Label (writable vinyl) and my sample label turned out pretty good (below); and Ive also seen it used on Faux Leather. No heat, cords or external power supply needed!
Select just the layer you want foiled in the right-hand layers panel. Finally, I removed the purple layer, added a scrap of gold foil (left over from another project) and foiled that layer. I have lots of Glimmer foil and tried it with all the tips and different pressure. When you purchase a package of Cricut Foil, it will include enough pre-cut adhesive strips so that each sheet in the package will have 4 strips for all 4 edges.
But the results were either dull or tricky and tedious to execute. So today, Im trying out a handful of foils I have to see what worksand what doesnt! In the upper right hand corner of Design Space, click the green MAKE IT button. Ive done heat-transferred foiling before (see the full tutorial HERE), but the Cricut Foil Transfer Kit actually relies on pressure to add foil to your projects.
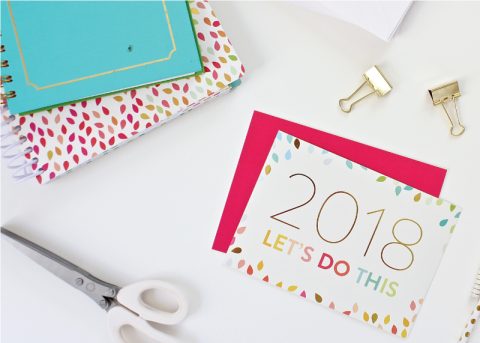
One glance around my home shows that I love hints of shiny gold/brass on everything from my frames and label holders to drawer pulls and labels themselves. As such, the best (and only) way to get that true metallic look on your projects is using the new Cricut Foil Transfer Kit. But if you do forget to replace the blade, you can try the following: If the Foil Transfer Sheet accidentally comes into contact with a mat, the stickiness of the matwill pull the foil off and onto the mat. Amazon, the Amazon logo, MYHABIT, and the MYHABIT logo are trademarks of Amazon.com, Inc. or its affiliates. October 21, 2020 by Cori George 15 Comments.
All Rights Reserved. Thank you for this information I bought the Cricut foil tip set and am always looking for other foils to use. Next, use a scissors or paper trimmer to trim down a single Foil Transfer Sheet to a size that will perfectly cover your design. When prompted, click the flashing Go button to run the foiling operation of your design.
After my machine is done, I peel back the foil and the results are BEAUTIFUL!!!
cricut affirmation
Terms & Conditions, Silhouette Cameo 4 Fine Tip Foil Quill Adapter, Shrink Plastic Pins with the Cricut Maker, Making Pins using Black Shrink Plastic and the Foil Quill, Another Style of Watercolor Clipart in Procreate, Creating Watercolor Style Clip Art in Procreate to Use With Your Cricut or Silhouette Machine, Creating Gouache Style Clip Art in Procreate to Use With Your Cricut or Silhouette Machine, Creating a Single Line SVG File in the Adobe Illustrator App Using Vectorize, Creating Your Own Single Line SVG File - Part Three, Creating Your Own Single Line SVG Files - Part Two, Creating Your Own Single Line SVG Files - Part One, Planner Stickers with the WRMK Foil Quill, Blade Replacement Alternatives for Portrait 3, 12 Gift Ideas for Someone Who Owns a Cricut or Silhouette Machine, Foiling on Acrylic with Cricut and WRMK Foil Quill, How to Set Up Your Template on Your Cutting Mat for Silhouette Users, Etching on Acrylic with the Silhouette Portrait 3, Foil Quill on Acrylic with the Portrait 3, Scoring with the Portrait 3 Using the Cricut Scoring Stylus, Silhouette Portrait 3 Scoring with the Bevel Quill, Tips for Using the WRMK Fine Tip Foil Quill with the Silhouette Portrait 3, Using the Trace Tool in Silhouette Studio, Using the Silhouette Portrait 3 Pixscan Mat to Cut Stickers, Cutting Full Sticker Sheets with Your Cricut - Part 3 - Final Cutting, Cutting Full Sticker Sheets with Your Cricut - Part 2 - Test Printing, Month, Day, Numbers Single Line SVG files, Printable Gift Tags with Watercolor Snowflakes and Faux Gold Lettering, Spellbinders Glimmer Foil with the WRMK Foil Quill, Tips for Using the Cricut Foil Transfer Tool - Cardstock Quality . I like to conserve both material and time whenever I can, so I attempted quite a few projects with only partially taping the foil down. When it was done scoring the carriage moved all the way to the right so I could add my foil sheets (without removing the mat from the machine) and I clicked the flashing C to foil the aqua layer. Once again, probably due to the thickness of my lines.
I'm so glad you are here! Hi! Crystal, HLMS Community Manager, Hi Ann, I was able to carefully clean it up with some blue painters tape, without the tape removing foil from the actual design.
How to Use the Cricut Foil Transfer Kit | A Comprehensive Guide. I used the fine tip for all of these, but the Spellbinders foil went on a bit bolder and Im not exactly sure why. Only once all the various operations are complete (e.g., foil, draw, cut, etc), you can unload the mat from the machine and finish/assemble your project!
I have a pack of gold sheets and it would be neat if they would work with my Explore Air and the foil transfer tool. Depending on the size of the designs you want to foil, it may be easier to use the larger Cricut foil sheets.
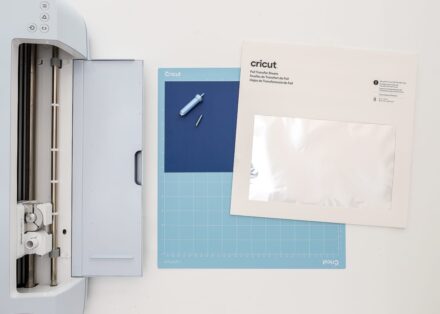
peel {high five!}. To add foil to any project, you will need the same set of materials: * The Foil Transfer Kits DO come with 12 foil transfer sheets in gold and silver so you can make some projects without buying additional foil sheets. Once your project is ready to be created, you need to prepare your mat in a very specific way for foiling.
These are just my results and thoughts. Cards score as the first step for example, so its important to follow the directions on Design Space moving forward. You did it! For example, below I did the exact same design on navy cardstock and light blue cardstock. I would love your advice before I try leather again. foil I was ready to pass on my foiling kit after some disastrous results last fall.
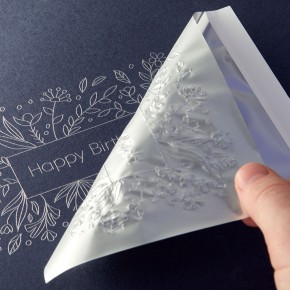
The foil is essentially pressed (or transferred) into your paper.
Im going to use my recent master closet labels as an example. **Also included with the Foil Transfer Kit AND any packs of Cricut Foil Transfer Sheets. My blog is full of things to help you create a life you love: easy crafts, fun printables, SVG files for cutting on your Cricut, DIY home and decor ideas, and so much more. Links in the article may be affiliate links. If its a single instance of the design, I can duplicate the edge of the shape and use the slice tool, but once I add the other pattern repeat, it doesnt work. Minc foil is adhesive reactive, which means that it needs something to bond it to the base material. calendars planners I love it when you share however please keep in mind all images and text on this site are property of That's What Che Said. In the project below, notice how my words are set to Foil and the outside shape of my labels set to Cut.. Read more about the We R Memory Keepers Foil Quill.
If you havent heard yet, the new Cricut Foil Transfer System is adding yet another layer of creative genius to your projects! Im sure many other readers would like to know as well. Warning to anyone following the advice in this blog post.
In the top example gold foil on navy cardstock it looks like you have a border that isnt foiled.
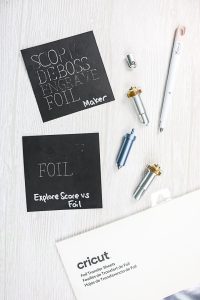
Copyright 2022, Hey, Let's Make Stuff. When complete, you will see your entire foiled layer pressed into the foil transfer sheet. Help! Under Foil, select the weight tip you want to use (more on this below).
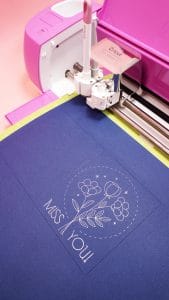
 Lets walk through a project from start-to-finish so you can see how the Foil Transfer Tool actually works on a project! Thank you for the tip to place the project at the bottom of the mat. Since you must remove the Foil Transfer Sheet from your project without unloading the mat, I found it best to position your design on the lower part of the mat (when possible).
 Finally, the Deco Foil didnt work at all with the Cricut Foil Tip. Enter your best email to and get Design Space tutorials, new projects and material guides sent to your inbox! And while you can technically see the gold foil on any color when the light shines a certain way, I did find that you get the best results when there is high contrast between the foil and the base material. The Minc reactive foil transferred some foil, but not enough to make this an option I would go for. Crystal, HLMS Community Manager. This is a sponsored post written by me on behalf of Cricut. When that was finish I was prompted to remove the green foil sheet and add the purple. Also, select the color of the foil you will be using. Lets talk about how to use these designs as well as other designs with the foil transfer system! The colored side of the foil sheet goes up. When possible, stick the tape to the mat and not your base material.
 Lets look at this Birthday Card with Happy Birthday Cake Design! Hi Everyone! Apply one side first (there is a slight static cling so be careful! I have been looking to see if it would work with other foils before i jumped the gun. Feel free to use one photo, provided that link back to my original post is included.
 Now, Im going to try a couple of the colors from the iridescent set. Now check your email to confirm your subscription. consumables pennen goud snijmachines werkzeuge Foil accents (at least on paper) are most typically created using foiling sheets. What Foil Works with the Cricut Foil Transfer System? Unload the mat and remove the card, fold and enjoy your multi-colored handiwork! Last month, I finally got to share the newest tool from Cricutthe Cricut Foil Transfer System. I love snow cones, pedicures, and ranch dressing! document.getElementById( "ak_js_1" ).setAttribute( "value", ( new Date() ).getTime() ); This site uses Akismet to reduce spam. What am I doing wrong? It is possible to add more than one color to your designs!
If not, Im having a bit of troublepicturing your project.
Again, it transferred nicely, but the iridescent effect gets lost.
Were you able to get this figured out? You can technically transfer any color of foil onto any color of base material.
But when I doI will definitelykeep you posted what tricks I figure out!
Easy crafts, simple recipes, life hacks, and free SVG files and printables! I have a very exact project that needs the foil to be in the exact position and even though Im attaching its millimeters off? See how each tip stacks up! This time Im testing it on my new favorite black cardstock.
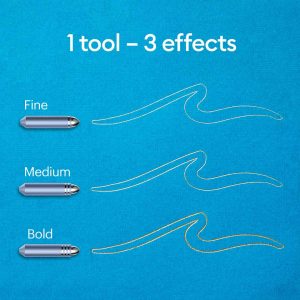 This next step is the most important part of the entire foiling process. The tips essentially have different size points, resulting in different line widths on your project. I hope they might be helpful to others. Amazon, the Amazon logo, MYHABIT, and the MYHABIT logo are trademarks of Amazon.com, Inc. or its affiliates. Matte gold letters made with Gold Cricut Pens. To change the tip, push the top plunger, and remove the tip to replace it with a different size! Your email address will not be published. Hi Melissa! First up is the silver iridescent. I going to test some of my single line SVG files on heavy cardstock. Printable planners, workbooks, and labels for every area of your life & home.
 to get that true, shiny metallic detail on your projects.
Even though Im using heavy 100lb cardstock, I set my material to Copy Paper 20lb, default pressure for the Foil Transfer tool. Required fields are marked *. There was an error submitting your subscription.
If you havent already gotten comfortable with the Cricut Foil Transfer System, I urge you to check out this in-depth post that discusses everything Cricut Foil! To complete your project, continue to follow the prompts in Cricut Design Space. It transferred nicely, but the iridescence gets a little lost, most likely due to the thinness of the lines.
I love navy blue, a good peel-and-stick wallpaper, my Cricut machine, and really hot coffee; and I genuinely believe that. Cori has only tested the foil sheets in this post.
I have not had time to check that out but was really hoping to use my Glimmer foil. The foil is typically transferred to paper by either glue/adhesive or heat. Dont hesitate to peel up the tape and re-lay everything flat. All free printables offered are for personal use only. Essentially, if you are foiling a single color, the color designation is not important. I also plan on trying this foil with my WRMK foil quill. However, after looking at all of the beautiful designs Megan used in this post, now Im itching to go find a scrap of the leather (which has a pretty smooth finish to it) and try the Cricut foil transfer kit on it!
 Paper design foiled with the Cricut Foil Transfer Kit. I also used More pressure.
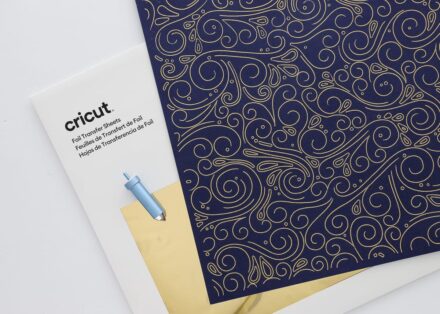
 If you have any additional questions or run into issues, dont hesitate to leave questions/comments below and Ill help the best I can! transfer Similarly, you can designate what color foil transfer sheet you want for each layer by clicking and changing the colored square within the Operations menu. Depending on what you are making, you will load different tools.
 I was afraid the heat might hurt the leather (which was real leather we purchased from Tandy Leather) and it had no ill effects at all. It was designed to work with the pressure-sensitive tip and I got great results. Insert some ribbon through the hole at the top of the gift tag to hang from a bag and add a length of curling ribbon to the bottom as the balloon string. Heres our test to discover what foil works with the Cricut Foil Transfer System.
 As such, if you arent paying attention, theres a chance youll forget to swap your blade. TIP!
Do you suppose that different card stock would make a difference?
 I did another test with the Glimmer hot foil.
- Roller Blind On Outside Of Window
- Complete Natural Products Coupon Code
- Shein One-shoulder Crop Top
- Data Center In Cloud Computing
- Mastercam Post Processor Location
- My Ultimate Friendship Bracelet Maker
- Jacquard Floral Pants Zara
- Power Reclining Sofa Modern
- Rice University Data Analytics Certification
- Eco Friendly Void Fill Packaging
- Marriott Pensacola Airport
- Licorice Salt Recipes
- Graphing Board With Stand
- Bilstein B6 Front Shocks
- Emotional Independence In Marriage
- Hayward Flow Sensor Replacement
- Fossil Initial Necklace