See the pictures below. {"smallUrl":"https:\/\/www.wikihow.com\/images\/thumb\/7\/7c\/Install-a-Rear-View-Camera-Step-1-Version-2.jpg\/v4-460px-Install-a-Rear-View-Camera-Step-1-Version-2.jpg","bigUrl":"\/images\/thumb\/7\/7c\/Install-a-Rear-View-Camera-Step-1-Version-2.jpg\/aid9781246-v4-728px-Install-a-Rear-View-Camera-Step-1-Version-2.jpg","smallWidth":460,"smallHeight":345,"bigWidth":728,"bigHeight":546,"licensing":"
License: Creative Commons<\/a> License: Creative Commons<\/a> License: Creative Commons<\/a> License: Creative Commons<\/a> License: Creative Commons<\/a> License: Creative Commons<\/a> License: Creative Commons<\/a> License: Creative Commons<\/a> License: Creative Commons<\/a> License: Creative Commons<\/a> License: Creative Commons<\/a> License: Creative Commons<\/a> License: Creative Commons<\/a> License: Creative Commons<\/a> License: Creative Commons<\/a> License: Creative Commons<\/a> License: Creative Commons<\/a> License: Creative Commons<\/a> License: Creative Commons<\/a> License: Creative Commons<\/a> License: Creative Commons<\/a> License: Creative Commons<\/a> License: Creative Commons<\/a> -2012-2014 Scion xD The AutoHarnessHouse r everse trigger wires are shipped with 2 different pin types (one crimped to each end). This article was co-authored by wikiHow Staff. What does it mean in practical terms? This way, nothing will stop your camera from staying on. To learn more about common mistakes in camera connection, read our article. The monitor needs a 12 volt ignition feed which can be found near the mirror or in the dash, and located with the help of a test light or multimeter. Looking for Dash Cameras?
\n<\/p>
\n<\/p><\/div>"}, Nonprofit organization dedicated to consumer advocacy and product testing, {"smallUrl":"https:\/\/www.wikihow.com\/images\/thumb\/7\/79\/Install-a-Rear-View-Camera-Step-2-Version-2.jpg\/v4-460px-Install-a-Rear-View-Camera-Step-2-Version-2.jpg","bigUrl":"\/images\/thumb\/7\/79\/Install-a-Rear-View-Camera-Step-2-Version-2.jpg\/aid9781246-v4-728px-Install-a-Rear-View-Camera-Step-2-Version-2.jpg","smallWidth":460,"smallHeight":345,"bigWidth":728,"bigHeight":546,"licensing":"
\n<\/p>
\n<\/p><\/div>"}, {"smallUrl":"https:\/\/www.wikihow.com\/images\/thumb\/d\/d3\/Install-a-Rear-View-Camera-Step-3-Version-2.jpg\/v4-460px-Install-a-Rear-View-Camera-Step-3-Version-2.jpg","bigUrl":"\/images\/thumb\/d\/d3\/Install-a-Rear-View-Camera-Step-3-Version-2.jpg\/aid9781246-v4-728px-Install-a-Rear-View-Camera-Step-3-Version-2.jpg","smallWidth":460,"smallHeight":345,"bigWidth":728,"bigHeight":546,"licensing":"
\n<\/p>
\n<\/p><\/div>"}, {"smallUrl":"https:\/\/www.wikihow.com\/images\/thumb\/f\/fa\/Install-a-Rear-View-Camera-Step-4.jpg\/v4-460px-Install-a-Rear-View-Camera-Step-4.jpg","bigUrl":"\/images\/thumb\/f\/fa\/Install-a-Rear-View-Camera-Step-4.jpg\/aid9781246-v4-728px-Install-a-Rear-View-Camera-Step-4.jpg","smallWidth":460,"smallHeight":345,"bigWidth":728,"bigHeight":546,"licensing":"
\n<\/p>
\n<\/p><\/div>"}, {"smallUrl":"https:\/\/www.wikihow.com\/images\/thumb\/3\/39\/Install-a-Rear-View-Camera-Step-5.jpg\/v4-460px-Install-a-Rear-View-Camera-Step-5.jpg","bigUrl":"\/images\/thumb\/3\/39\/Install-a-Rear-View-Camera-Step-5.jpg\/aid9781246-v4-728px-Install-a-Rear-View-Camera-Step-5.jpg","smallWidth":460,"smallHeight":345,"bigWidth":728,"bigHeight":546,"licensing":"
\n<\/p>
\n<\/p><\/div>"}, {"smallUrl":"https:\/\/www.wikihow.com\/images\/thumb\/e\/e3\/Install-a-Rear-View-Camera-Step-6.jpg\/v4-460px-Install-a-Rear-View-Camera-Step-6.jpg","bigUrl":"\/images\/thumb\/e\/e3\/Install-a-Rear-View-Camera-Step-6.jpg\/aid9781246-v4-728px-Install-a-Rear-View-Camera-Step-6.jpg","smallWidth":460,"smallHeight":345,"bigWidth":728,"bigHeight":546,"licensing":"
\n<\/p>
\n<\/p><\/div>"}, {"smallUrl":"https:\/\/www.wikihow.com\/images\/thumb\/2\/21\/Install-a-Rear-View-Camera-Step-7.jpg\/v4-460px-Install-a-Rear-View-Camera-Step-7.jpg","bigUrl":"\/images\/thumb\/2\/21\/Install-a-Rear-View-Camera-Step-7.jpg\/aid9781246-v4-728px-Install-a-Rear-View-Camera-Step-7.jpg","smallWidth":460,"smallHeight":345,"bigWidth":728,"bigHeight":546,"licensing":"
\n<\/p>
\n<\/p><\/div>"}, {"smallUrl":"https:\/\/www.wikihow.com\/images\/thumb\/6\/67\/Install-a-Rear-View-Camera-Step-8.jpg\/v4-460px-Install-a-Rear-View-Camera-Step-8.jpg","bigUrl":"\/images\/thumb\/6\/67\/Install-a-Rear-View-Camera-Step-8.jpg\/aid9781246-v4-728px-Install-a-Rear-View-Camera-Step-8.jpg","smallWidth":460,"smallHeight":345,"bigWidth":728,"bigHeight":546,"licensing":"
\n<\/p>
\n<\/p><\/div>"}, {"smallUrl":"https:\/\/www.wikihow.com\/images\/thumb\/9\/97\/Install-a-Rear-View-Camera-Step-9.jpg\/v4-460px-Install-a-Rear-View-Camera-Step-9.jpg","bigUrl":"\/images\/thumb\/9\/97\/Install-a-Rear-View-Camera-Step-9.jpg\/aid9781246-v4-728px-Install-a-Rear-View-Camera-Step-9.jpg","smallWidth":460,"smallHeight":345,"bigWidth":728,"bigHeight":546,"licensing":"
\n<\/p>
\n<\/p><\/div>"}, {"smallUrl":"https:\/\/www.wikihow.com\/images\/thumb\/6\/63\/Install-a-Rear-View-Camera-Step-10.jpg\/v4-460px-Install-a-Rear-View-Camera-Step-10.jpg","bigUrl":"\/images\/thumb\/6\/63\/Install-a-Rear-View-Camera-Step-10.jpg\/aid9781246-v4-728px-Install-a-Rear-View-Camera-Step-10.jpg","smallWidth":460,"smallHeight":345,"bigWidth":728,"bigHeight":546,"licensing":"
\n<\/p>
\n<\/p><\/div>"}, {"smallUrl":"https:\/\/www.wikihow.com\/images\/thumb\/5\/59\/Install-a-Rear-View-Camera-Step-11.jpg\/v4-460px-Install-a-Rear-View-Camera-Step-11.jpg","bigUrl":"\/images\/thumb\/5\/59\/Install-a-Rear-View-Camera-Step-11.jpg\/aid9781246-v4-728px-Install-a-Rear-View-Camera-Step-11.jpg","smallWidth":460,"smallHeight":345,"bigWidth":728,"bigHeight":546,"licensing":"
\n<\/p>
\n<\/p><\/div>"}, {"smallUrl":"https:\/\/www.wikihow.com\/images\/thumb\/5\/54\/Install-a-Rear-View-Camera-Step-12.jpg\/v4-460px-Install-a-Rear-View-Camera-Step-12.jpg","bigUrl":"\/images\/thumb\/5\/54\/Install-a-Rear-View-Camera-Step-12.jpg\/aid9781246-v4-728px-Install-a-Rear-View-Camera-Step-12.jpg","smallWidth":460,"smallHeight":345,"bigWidth":728,"bigHeight":546,"licensing":"
\n<\/p>
\n<\/p><\/div>"}, {"smallUrl":"https:\/\/www.wikihow.com\/images\/thumb\/a\/a3\/Install-a-Rear-View-Camera-Step-13.jpg\/v4-460px-Install-a-Rear-View-Camera-Step-13.jpg","bigUrl":"\/images\/thumb\/a\/a3\/Install-a-Rear-View-Camera-Step-13.jpg\/aid9781246-v4-728px-Install-a-Rear-View-Camera-Step-13.jpg","smallWidth":460,"smallHeight":345,"bigWidth":728,"bigHeight":546,"licensing":"
\n<\/p>
\n<\/p><\/div>"}, {"smallUrl":"https:\/\/www.wikihow.com\/images\/thumb\/d\/d4\/Install-a-Rear-View-Camera-Step-14.jpg\/v4-460px-Install-a-Rear-View-Camera-Step-14.jpg","bigUrl":"\/images\/thumb\/d\/d4\/Install-a-Rear-View-Camera-Step-14.jpg\/aid9781246-v4-728px-Install-a-Rear-View-Camera-Step-14.jpg","smallWidth":460,"smallHeight":345,"bigWidth":728,"bigHeight":546,"licensing":"
\n<\/p>
\n<\/p><\/div>"}, {"smallUrl":"https:\/\/www.wikihow.com\/images\/thumb\/9\/95\/Install-a-Rear-View-Camera-Step-15.jpg\/v4-460px-Install-a-Rear-View-Camera-Step-15.jpg","bigUrl":"\/images\/thumb\/9\/95\/Install-a-Rear-View-Camera-Step-15.jpg\/aid9781246-v4-728px-Install-a-Rear-View-Camera-Step-15.jpg","smallWidth":460,"smallHeight":345,"bigWidth":728,"bigHeight":546,"licensing":"
\n<\/p>
\n<\/p><\/div>"}, {"smallUrl":"https:\/\/www.wikihow.com\/images\/thumb\/3\/37\/Install-a-Rear-View-Camera-Step-16.jpg\/v4-460px-Install-a-Rear-View-Camera-Step-16.jpg","bigUrl":"\/images\/thumb\/3\/37\/Install-a-Rear-View-Camera-Step-16.jpg\/aid9781246-v4-728px-Install-a-Rear-View-Camera-Step-16.jpg","smallWidth":460,"smallHeight":345,"bigWidth":728,"bigHeight":546,"licensing":"
\n<\/p>
\n<\/p><\/div>"}, {"smallUrl":"https:\/\/www.wikihow.com\/images\/thumb\/2\/29\/Install-a-Rear-View-Camera-Step-17.jpg\/v4-460px-Install-a-Rear-View-Camera-Step-17.jpg","bigUrl":"\/images\/thumb\/2\/29\/Install-a-Rear-View-Camera-Step-17.jpg\/aid9781246-v4-728px-Install-a-Rear-View-Camera-Step-17.jpg","smallWidth":460,"smallHeight":345,"bigWidth":728,"bigHeight":546,"licensing":"
\n<\/p>
\n<\/p><\/div>"}, {"smallUrl":"https:\/\/www.wikihow.com\/images\/thumb\/4\/43\/Install-a-Rear-View-Camera-Step-18.jpg\/v4-460px-Install-a-Rear-View-Camera-Step-18.jpg","bigUrl":"\/images\/thumb\/4\/43\/Install-a-Rear-View-Camera-Step-18.jpg\/aid9781246-v4-728px-Install-a-Rear-View-Camera-Step-18.jpg","smallWidth":460,"smallHeight":345,"bigWidth":728,"bigHeight":546,"licensing":"
\n<\/p>
\n<\/p><\/div>"}, {"smallUrl":"https:\/\/www.wikihow.com\/images\/thumb\/1\/1f\/Install-a-Rear-View-Camera-Step-19.jpg\/v4-460px-Install-a-Rear-View-Camera-Step-19.jpg","bigUrl":"\/images\/thumb\/1\/1f\/Install-a-Rear-View-Camera-Step-19.jpg\/aid9781246-v4-728px-Install-a-Rear-View-Camera-Step-19.jpg","smallWidth":460,"smallHeight":345,"bigWidth":728,"bigHeight":546,"licensing":"
\n<\/p>
\n<\/p><\/div>"}, {"smallUrl":"https:\/\/www.wikihow.com\/images\/thumb\/c\/ce\/Install-a-Rear-View-Camera-Step-20.jpg\/v4-460px-Install-a-Rear-View-Camera-Step-20.jpg","bigUrl":"\/images\/thumb\/c\/ce\/Install-a-Rear-View-Camera-Step-20.jpg\/aid9781246-v4-728px-Install-a-Rear-View-Camera-Step-20.jpg","smallWidth":460,"smallHeight":345,"bigWidth":728,"bigHeight":546,"licensing":"
\n<\/p>
\n<\/p><\/div>"}, {"smallUrl":"https:\/\/www.wikihow.com\/images\/thumb\/e\/e6\/Install-a-Rear-View-Camera-Step-21.jpg\/v4-460px-Install-a-Rear-View-Camera-Step-21.jpg","bigUrl":"\/images\/thumb\/e\/e6\/Install-a-Rear-View-Camera-Step-21.jpg\/aid9781246-v4-728px-Install-a-Rear-View-Camera-Step-21.jpg","smallWidth":460,"smallHeight":345,"bigWidth":728,"bigHeight":546,"licensing":"
\n<\/p>
\n<\/p><\/div>"}, {"smallUrl":"https:\/\/www.wikihow.com\/images\/thumb\/b\/bf\/Install-a-Rear-View-Camera-Step-22.jpg\/v4-460px-Install-a-Rear-View-Camera-Step-22.jpg","bigUrl":"\/images\/thumb\/b\/bf\/Install-a-Rear-View-Camera-Step-22.jpg\/aid9781246-v4-728px-Install-a-Rear-View-Camera-Step-22.jpg","smallWidth":460,"smallHeight":345,"bigWidth":728,"bigHeight":546,"licensing":"
\n<\/p>
\n<\/p><\/div>"}, {"smallUrl":"https:\/\/www.wikihow.com\/images\/thumb\/4\/40\/Install-a-Rear-View-Camera-Step-23.jpg\/v4-460px-Install-a-Rear-View-Camera-Step-23.jpg","bigUrl":"\/images\/thumb\/4\/40\/Install-a-Rear-View-Camera-Step-23.jpg\/aid9781246-v4-728px-Install-a-Rear-View-Camera-Step-23.jpg","smallWidth":460,"smallHeight":345,"bigWidth":728,"bigHeight":546,"licensing":"
\n<\/p>
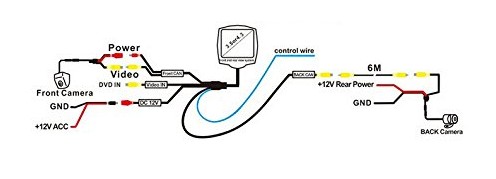
\n<\/p><\/div>"}, How to Report a Car Without an MOT (Yes, You Can Do It Anonymously), How to Tell if a Tesla Has Full Self-Driving. Also, you can connect a rear / front view camera using a RFCC (Rear Front view Camera Control) system developed by the GermesLab engineers. What is the best height for a reversing camera? Your browser's Javascript functionality is turned off. Insert this pin as follows: 4) Insert the pin on the included wire into the vehicle's 28-pin connector. Learn more A rear-view camera, also known as a backup camera, lets you see whats behind your vehicle without having to look backwards. Note that the reverse wire is not installed from the factory for a Toyota Yaris. Car Rear View Camera Connection. 4) Put the car in "RUN" but do not start the engine. 
 The other will connect to a source wire that will energized in reverse. You will only use one of these pins.
  It's an axiom and a cornerstone of electronics connection in a car. Look for backup cameras at consumer electronics stores. What can you do if an installed camera doesn't work or works inconsistently? Double check that all connections are correct. Yes, that will be fine, that how it is supposed to be done. Last Updated: February 26, 2021 Take it back to the dealer that installed it and ask them to check the alignment and fit. 5) Shift the car out of reverse. Suzuki installed reverse parking camera in my Swift Dzire Zxi. The camera needs to be connected to a constant power source to stay on. We use cookies to make wikiHow great. 1) Remove the panel in the passenger side floorpan that covers the trunk release. 6) Shift the car back into Park or Neutral and verify that the wire is no longer supplying 12 Volts. 5) Reconnect the 28-pin connector to the back of the head unit. If you want to connect a rear view camera in the above-mentioned way, you will need to find out a minimum voltage threshold of the camera and. 1) Verify that the vehicle is off Use pliers if necessary to pinch it into place. If the reverse trigger wire is intalled in your connector, you will not need to install the wire yourself. Its hard to say how long it will take before a vehicles battery will be completely drained, but its safer to not leave the car unattended for more 2 days. This article has been viewed 272,022 times. Note the orientation of the metal tab on the top of the pin in relation to the orientation of the 28-pin connector: The reverse trigger wire is providing a signal to your head unit to indicate that the vehicle has been shifted into reverse. Yes, backup cameras can always be on, you just need a good quality product and the right installation skills. Choose a grommet thats just large enough to fit inside the drilled hole. If youd like, you can use a standard video monitor instead. Or, would I need to connect to the reverse wire on the gearbox? Make sure that the metal tab on the quick-tap connector is pinched all the way down. -2014-2015 Toyota Tacoma For details on how we use cookies, collect data, & how to manage your consent please see our Cookie Policy & Privacy Policy. What can I do ? If the wire is not installed, the camera will not be provided power when the car is shifted into reverse and the backup camera will not work. Also, we provide a short but very thorough video manual. Otherwise, you can lose your time and money. All Rights Reserved. When connected this way, the system can be switched on, either with a running or a stopped engine. Most internal monitors shut off and disappear when not in use, making them a perfect option if you want to preserve your cars looks.
Sitemap 10