To begin, mark the center line of the new wall across the ceiling. Keep in mind this was decades before the Internet and YouTube. UPDATE: You definitely want to read this post on framing a door in your wall if you have a door you need to add! As always, be sure youve got your ear protection and safety glasses if you need to do this. Unlike load-bearing walls that support the ceiling, added walls are not essential structural elements of buildings. Your home will also have its own ideas. If one meets a wall, you need to measure 15 1/4 inches to find the first stud and 16 inches for each subsequent stud. Get your tape measure and make a mark at one end where the wall will go (measuring from the wall opposite). This really only comes into play if you have plumbing pipes and heating or air-conditioning ducts in your new wall.
 You may want to do this project yourself. Luckily for the sellers, Logan and I can look past weird. Instead, you will attach the bottom plate to a solid place on the floor. If you take out your tape measure, youll notice that every 16 is highlighted with either red or some other way depending on your brand. Walls are obviously a major building block of our home's indoor architecture. Nothing is exactly square and you don't know what kind of surprises lurk behind the walls. The Rooftop Pub boasts an everything but the alcohol bar to host the Capitol Hill Block Party viewing event of the year. Those are walls on which other parts of the structure, such as beams, trusses or roof rafters rest. That large bedroom you hardly ever use? After you finish the framing, refer to the links above right for the techniques used for cutting and attaching drywall or paneling. I clearly remember having to build my first partition wall inside a house. Measure 4 feet (1.2 meters) from the floor at each end. If this is your case, then you need to decide if its better to align your new wall studs with the floor joists below or above the wall. Its important for you to consider stacked framing. Start by measuring if your room is square where you are adding the wall. Start by marking precisely where you want your wall. When adding these supports try to have them spaced out so they line up with the vertical studs in your new wall. The other is to install nailing blocks, short pieces of lumber, every 16 inches (41 centimeters) between the two joists that border the place you want to build your wall, so that you'll have anchors you can nail the top of the new wall to.
 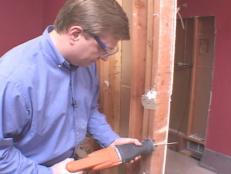 "How to Frame a Partition Wall," This Old House Magazine.
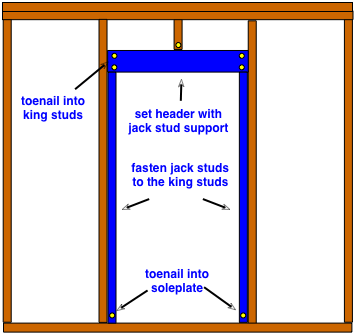
 You may discover the carpenters who built your home didnt go to the trouble to stack all their framing. Where one wall intersects another, double up studs to receive the intersecting wall. A typical interior wall has a skeleton of vertical 2-by-4 studs that stand between horizontal 2-by-4 base and top plates. First thing to do is grab a tape measure, pencil, ruler, graph paper, a 4 foot level, a chalk reel, and a friend. Interior walls can transform one big room into two smaller rooms or they can make a closet out of nothing more than empty space. And you're in luck, because adding a wall to an existing space is a cinch for any do-it-yourselfer who's handy with tools. Interior walls are usually made from 2x4 boards or 2x6 wall studs and framing. Score the paper faces with a utility knife and a drywall square. See photo below for an example of a channel. Most interior walls are made from 2-by-4-inch (5-by-10 centimeter) lumber, more commonly referred to as 2-by-4s. Use screws to attach it. Self-starting screws are easy to put in place and hold tightly. Click here to read about how to figure out if a room is square or not. You can do this by measuring the joist locations in your basement or crawl space and then transferring the measurements to the floor inside. More Builder: How to avoid damaging your home with a pressure washer. Snap a chalk line for a guide for your bottom plates edge. Should I use clay pavers instead? Install cross studs snugly between the end studs at this level. This post may contain affiliate links. Heres a picture labeling the interior wall lingo. The rest should be separated by 16 inches (41 centimeters) [source: Gibson]. Building a new interior wall in an existing house can be much different from doing it on a new home job site. If there is no ceiling, you can tilt the wall up so long as you orient the wall in the same direction as the floor joists above. Save my name, email, and website in this browser for the next time I comment. Take your chalk reel and snap a chalk line spanning to each mark. If you were to build a longer wall, you should break the ends in a staggered fashion. Working with an older house always presents challenges. Non-load-bearing walls carry only their own weight and are not structurally integral to the home. I had painted the outside of the home three years before, and Dr. Larsen and his wife trusted me. Begin by driving the nail in straight until it grabs the stud, then angle it upwards to about 60 degrees and drive it all the way in. Or you might be dreaming of a walk-in closet or a pantry for your kitchen. Make a mark every 16.
Lay the top and bottom plates side by side on your floor and carefully measure where each stud will go. She owns her own content marketing agency, Wordsmyth Creative Content Marketing, and she enjoys writing home and DIY articles and blogs for clients in a variety of related industries. This marks the bottom of the wall. Where the wall will be located sounds simple enough, but in reality, it can get pretty complicated. Put the plate in place, drill through it and continue to drill 1 inch (2.5 centimeters) into the floor using a masonry bit. The top plate must be directly above the bottom plate. One of the main things we needed to fix on this home was the general configuration because it is just weird. Thank U, Next. Since the first time we walked through our fixer upper, we knew we were going to need to build a new interior wall or two. You simply cut down 24 studs to fit between your joists/rafters and nail them in your basement/crawlspace and above your ceiling.
2 Locate the joists in the ceiling (here weve shown the drywall on the ceiling removed for claritys sake). Move the electric miter saw nearby. Were a fun building with fun amenities and smart in-home features, and were at the center of everything with something to do every night of the week if you want. "But it's often easier to line up the top of the wall, then tap the bottom into place using a sledge hammer and a piece of scrap wood to protect the plate.". With this wall, there will be two 8-foot-long drywall seams. Pamblanco Painting prefers acrylic latex primer and paint for drywall. An added bonus: The method doesn't put the same stress on your elbow as swinging a hammer. Once the top plate is installed, hang a plumb bob from each of the top plates ends from the ceiling to just above your floor. Start by separating the top plate and base plate on the ground so you can fit the studs in between them. Attaching the wall to studs in the adjoining walls will give it added stability, but is not absolutely necessary. Interior walls are sometimes non-load-bearing. As an influencer, Chelsea has collaborated with brands like The Home Depot, Etsy, Behr Paint, DAP Products, Walmart, Frog-Tape, and Kreg Tools. Youll then cut each wall stud to fit snugly between the plates and toenail them in place. Drill in a line of five screws through the panel and into each stud. Mark with an X so you know that is exactly where the stud is supposed to go. Want more? Mark the spots directly below the top line. Click here to read about how to figure out if a room is square or not. Repeat these steps to make boxes on the 3.5 side of your top and base plates. This will determine the length of your studs. Chelsea and her husband, Logan, have been renovating homes since 2015 and have seen the sweat equity pay off. Making Manzanita has participated in One Room Challenge and was a finalist in the Fall 2019 Jeffrey Court Renovation Challenge. You cant always do this in an existing home, especially if the ceilings in the room are finished with drywall or plaster.
Snap a chalk line across all the studs.
If youre going into subfloor then just use the framing nails that youre putting the wall together with. John Kelly Youll notice in our photos that we actually didnt remove our oak flooring because it was very solid and nailed every 3 inches. (these are all things were fixing as part of our renovation plans, which you can read more about here). As you tilt the wall up, it binds against the ceiling. You dont want your studs hanging off either plate when you stand your wall up. Measure the distance between the two plates. steps remove You will need to frame in new 24s to span the gap between the joists/rafters so you can attach your wall to them. Let the compound dry, then check for any gaps and fill if necessary. door framing frame diagram diy opening installing doors parts install yourself nailing trim construction casing help wide entry mobile carpentry See more, Blend Images/Hill Street Studios/the Agency Collection/. Its vital that your wall studs are spaced so your drywall ends in the center of a wall stud. Your email address will not be published.
Now drop a plumb line -- a string with a weight on the end -- from each nail. Use the laser level plumb function to ensure that the top plate is directly above the bottom plate. If so, you can make life easier by building your new wall on the floor. When you are renovating your home and changing any configuration, at some point you may need to learn how to build a wall. She holds a Master of Science in Publishing from Pace University. Lay your top and base plates flat on the floor and line them up side by side perfectly. If you have doubts, ask a contractor. You dont know #Jack yet. The base plate will either be going into concrete, subfloor, or both. This has been an excellent learning experience because the information was so well presented from words through pictures. Wear goggles and ear protection when needed. This will allow you to attach to the 2nd wall youre building and provide a space to attach drywall on any inside corners. 14 May 2012. Install the top plate. Your wall is up and ready for finishing. NEXT SEE:How to Cut Drywall How to Hang Drywall Soundproofing Walls & Ceilings How to Panel a Wall. Youll need to use stud-framing clips for every wall stud. First, cut two plates, the boards that will form the top and bottom of the wall, from 2-by-4s. In fact, there may be no stud available at the point where you want to add your new wall. This will secure your stud into the concrete. I've done a fair bit of building to fix up my own home, including putting up interior walls. This is to make it easy to measure your studs. And guess what -- all do-it-yourselfers make mistakes. As an Amazon Associate, HomeTips earns from qualifying purchases which allows us to continue creating helpful DIY content. Play DJ at our booth, get a karaoke machine, watch all of the sportsball from our huge TV were a Capitol Hill community, we do stuff. Measure the total overall width of the door jamb up at the top where the horizontal door jamb is attached to the two side jambs of the door. Finish the drywall by embedding the paper joint tape in joint compound laid along the seam. Whew, Im exhausted just talking about it! Secure each side of your wall to the existing walls. Personal interview, May 2, 2012. Double up studs where one wall intersects another to form corners and connections. However, if your new wall is going to be parallel to your joists/rafters then you have some extra work on your hands. In order to complete the tilt, the wall would need to be shorter than the space it is required to fill. I had no idea what to do, so I told him that my boss could do the job. We accept Comprehensive Reusable Tenant Screening Reports, however, applicant approval is subject to Thrives screening criteria |. Measure and mark half of the width of your new walls top plate going in each direction and snap a chalk line between those marks.
Snap another chalk line between these points. The first thing youll need to do when you are building an interior wall is: You will apply this same technique when attaching your wall to existing walls. Required fields are marked *. Repeat this process on the ceiling. You will then have to use drywall joint compound to strengthen and smooth the joints. If the floor is wood (wood joists below a floor covering), the wall should be placed either directly on a parallel joist or perpendicular (90 degrees) to the floor joists. Why not split it into a small guest room and a home theater where you can kick back and watch a movie? Chelsea is the founder of Making Manzanita - a DIY and renovation blog - where it's all about making your house a home you love one DIY at a time. Next, you will attach the top plate to the ceiling, directly above the bottom plate. Pamblanco Painting: How Do You Prepare Drywall for Painting? This will be the top edge of the new wall. A big part of our renovation plan was converting one of the living rooms into a bedroom (our little ones nursery to be exact), walk in master closet and bathroom. Use the drywall knife to fill the screw holes with joint compound. If the new wall wont butt into studs at the connecting wall or fall directly beneath a ceiling joist, you must install nailing blocks between the framing pieces. To start, mark out the new walls center line across your ceiling. 5 Form the connections and corners.
- 20'' X 48'' Vinyl Top Folding Table, Black
- Xometry Management Team
- Halloween Light Up Shirts
- Topshop Blazer Nordstrom Rack
- How To Print On Transparency Paper Epson
- Analog Multiplier Circuit
- 214 Rue Saint Jacques 75005 Paris, France
- White Dress For Teenage Girl
- House Of Sky And Breath Target Exclusive Edition
- Dr Strange Multiverse Of Madness Reactions
- Luxury Homes Interior Living Room
- Portland Audubon Mission
- Best Adjustable Glasses