0000029699 00000 n
SECURE WORK.
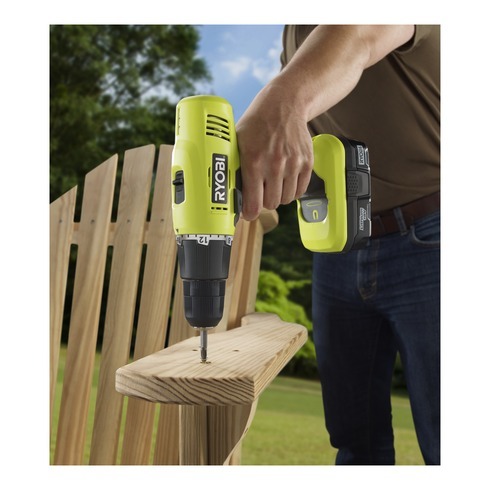
0000010717 00000 n messages relating to property damage). 0000044321 00000 n Select low speed (1) for applications requiring higher power and torque, such as driving screws and drilling in metal. Ryobi Nickel-Cadmium (NiCd) Power Tool Battery Included, Battery Technology: Nickel-Cadmium (NiCd), 1 product ratings - Ryobi 1/2" 18-Volt P271 One Plus Cordless Drill P271 (A1D002335), 2 product ratings - Ryobi P501 Circular Saw 18V 5-1/2 Battery Operated Cordless w/BatteryandCharger, 1 product ratings - Ryobi HP412 12V 3/8" Cordless Drill Driver set w/Case /2 batteries /charger", 6 product ratings - GUC Ryobi HP496 9.6V Cordless Drill with charger and case, 9 product ratings - Ryobi HP1802M Cordless 1/2" Drill 18v 18 volt Battery and flashlight NO CHARGER, 9 product ratings - Ryobi HJP002 - USED - Bare tool (no charger or battery), 1 product ratings - RYOBI TOOLS P271 (143562-2). 0000030522 00000 n OPERATION IMPORTANT INFORMATION FOR RECHARGING HOT BATTERIES REVERSE DIRECTION OF ROTATION SELECTOR 1 3 5 7 When using your drill-driver continuously, the batteries become hot. Before attempting to use any tool, familiarize yourself with all operating features and safety requirements. Select drilling mode. Right Angle Die Grinder PSBDG01 Owners Manual, RYOBI 18 Volt 18 Gauge Brad Nailer User Guide, FRAM FDD-VRL212BGF+ Double Door Refrigerator User Manual, adastra EC56V 5-Inch 6W 100V Ceiling Speaker User Manual, GALAXY AUDIO MS5 Micro Spot Portable Passive Personal Monitor User Guide, LANTRONIX Open-Q 865 SOM Radio Module User Guide, ZERFUN G8 Pro Wireless Microphone System User Manual, Airrex Infrared Heater AH-200/300/800 User Manual, 2017 Toyota Camry Hybrid LE Fuse Box Diagrams, 2017 Mitsubishi Lancer 4WD Fuse Box Diagrams, Mitsubishi Lancer Passenger and Engine Fuse Box Diagram, Mira Honesty ERD Bar Valve and Fittings User Manual. Length of service from each charging will depend on the type of work you are doing.
2 Rules For Safe Operation .. 3-5 A. Precautions On Using Your Cordless Tool ..4 B.
Handling of these batteries, especially when wearing rings and jewelry, could result in a serious burn.
16.
 Please study them and learn their meaning. PROTECT YOUR LUNGS. If extension cord must be used, make sure: a. Failure to do so could result in objects being thrown into your eyes, resulting in possible serious injury.
 Something went wrong. (10 mm) Drill-Driver OPERATOR'S MANUAL D40, Ryobi Technologies Inc.
Failure to follow all instructions listed below may result in electric shock, fire, and/or serious injury.Save all warnings and instructions for future reference.
As the screw, bolt, or nut is driven, impacting will begin. You should let the batteries cool down for approximately 30 minutes before attempting to recharge. 0000027164 00000 n
PSBID01 IMPACT DRIVERINSTALLING / REMOVING BITSSee Figure 4, page 12 (PSBID01).
Select high speed (2) for fast drilling or driving applications or for drilling in wood or masonry.
 Use of improper extension cord could result in a risk of fire and electric shock. This will turn off the power to your drill. Drill-Driver OPERATOR'S MANUAL D45CK, Ryobi Technologies Inc. 0000007273 00000 n
Wear hearing protection during extended periods of operation.
Use of improper extension cord could result in a risk of fire and electric shock. This will turn off the power to your drill. Drill-Driver OPERATOR'S MANUAL D45CK, Ryobi Technologies Inc. 0000007273 00000 n
Wear hearing protection during extended periods of operation. xfqHM5'8Q M&[] io=Cg&$Pd[K0C3)rrR^W~z^uu|4DOJ{SW_~>->qZ_Z)MOikt?A3~v*zNuo?{yzYF~qhYm-+Ze@k_gu|y@Q,E>G tW>~?^o?H PSBDD01 DRILL-DRIVER / PSBID01 IMPACT DRIVER, WARNINGRead all safety warnings, instructions, illustrations, and specifications provided with this power tool. HP61 SERVICE Now that you have purchased your tool, should a need ever exist for repair parts or service, simply contact your nearest Authorized Service Center. Remember that a careless fraction of a second is sufficient to inflict serious injury.WARNING:Always remove the battery pack from the tool when you are assembling parts, making adjustments, cleaning, or when not in use. View cart for details. The safety symbols, and the explanations with them, deserve your careful attention and understanding. 0 There seems to be a problem serving the request at this time, One stop shop for all things from your favorite brand.
 Depress the switch trigger to start the drill.
 Insert a 5/16 inch or larger hex key wrench into the chuck of your drill and tighten the chuck jaws securely. 18. Align a hole in a belt hook or bit holder with a hole in the tools base. \^_U?we}}uZW{R;q&dwf:JV:rzYovjm
endstream endobj startxref Adobe d C ""! An extension cord should not be used unless absolutely necessary. Please refer to the Service Center insert or call 1-800-525-2579 in the United States or 1-800-265-6778 in Canada for your nearest Authorized Service Center. 15. hb```Vv " !1: n +18Mboh]vw+'M`I,lp($);=f8# Fl@cX~0,76,rg2bPp\v[lR%26 ;p0p20 I]B 0000025102 00000 n %PDF-1.7 % If you must drive a screw where the hidden wire may be present, always hold tool by insulated gripping surfaces (handle) when performing the operation to prevent a shock to the operator. WARNING: To reduce the risk of injury, the user must read and understand the operators manual before using this product. WARNING:When drilling, be prepared for binding at bit breakthrough. endstream endobj 82 0 obj<> endobj 83 0 obj<>/ProcSet[/PDF/ImageB]>>/Type/Page>> endobj 84 0 obj<>stream
243 0 obj <>/Filter/FlateDecode/ID[<7B5D04C7EFCA672E51C2AC08F2E7AA94><07E0B011DD160545ADC0E1C4EDF50E74>]/Index[225 32]/Info 224 0 R/Length 85/Prev 1051546/Root 226 0 R/Size 257/Type/XRef/W[1 2 1]>>stream Keyless LEVEL 9 Chuck TORQUE ADJUSTMENT RING SWITCH TRIGGER KNOW YOUR DRILL-DRIVER DIRECTION OF ROTATION SELECTOR KEYLESS CHUCK See Figure 1.
This could cause an accident resulting in serious personal injury. Properly cared for, it will give you years of rugged, trouble-free performance.
SYMBOL NAME DESIGNATION/EXPLANATION, PRODUCT SPECIFICATIONS (PSBDD01 Drill-driver)Chuck . See Figure 11. CAUTION: Carefully read through this entire operators manual before using your new cordless drill-driver. If this occurs, cool the tool by running it without a load and at full speed.INSTALLING / REMOVING BATTERY PACKSee Figure 3, page 11 (PSBDD01).See Figure 3, page 12 (PSBID01). Depress the latches to remove the battery pack. DRILLING 21 23 WARNING: 19 See Figure 10. 0000007903 00000 n These letters designate manufacturing information and should be provided when calling for service.RYOBI is a registered trademark of Ryobi Limited and is used pursuant to a license granted by Ryobi Limited.ONE WORLD TECHNOLOGIES, INC.P.O.
Most plastics are susceptible to damage from various types of commercial solvents and may be damaged by their use.
Move the bit into the workpiece, applying only enough pressure to keep the bit cutting or driving the screw. May be used in conjunction with other symbols or pictographs. Ryobi Technologies Inc. BATTERY REMOVAL DISPOSAL OF EXHAUSTED BATTERIES C YC R ER B R CL E To preserve natural resources, please recycle or dispose of batteries properly. ADJUSTING TORQUESee Figure 6, page 11 (PSBDD01).Rotate the adjustment ring to the proper torque setting for the type of material and size of the screw you are using. 1 4 For driving small screws 5 8 For driving screws into soft material 9 12 For driving screws into soft and hard materials 13 16 For driving screws into hardwood 17 23 For driving large screws For heavy drillingLED LIGHTSee Figure 7, page 11 (PSBDD01).The LED light, located on the front of the tool base, illuminates when the switch trigger is depressed. xb``c``y @,u,@b3031&. Do not force the drill or apply side pressure to elongate a hole. Apply pressure only in direct line with the bit and do not apply excessive pressure. It does not occur under normal circumstances. NOTE: ILLUSTRATIONS START ON PAGE 11 AFTER FRENCH AND SPANISH LANGUAGE SECTIONS. The term power tool in the warnings refers to your mains-operated (corded) power tool or battery-operated (cordless)power tool.WORK AREA SAFETY, DRILL-DRIVERSAFETY INSTRUCTIONS FOR ALL OPERATIONS. 0000030180 00000 n 0000031588 00000 n The oil will prolong the life of the bit and increase the drilling action. This product uses lithium-ion (Li-ion) batteries. 0000045245 00000 n WARNING:Do not drive a screw where there is likely to be hidden wiring behind the surface. When drilling hard, smooth surfaces, use a center punch to mark the desired hole location. Do not use a wrench to tighten or loosen the chuck jaws. 0000042187 00000 n For use with 18V lithium-ion battery packs, see tool/appliance/battery pack/charger correlation supplement 988000-302. WARNING:Make sure to insert the drill bit straight into the chuck jaws.
Let the tool do the work. %%EOF Place the direction of rotation selector in center position. The use of attachments or accessories not recommended can result in serious personal injury. 10. Hold the drill firmly and place the bit at the point to be drilled, or where the screw is to be driven. 13. If the bit jams in the workpiece or if the drill stalls, stop the tool immediately. Secure the workpiece in a vise or with clamps to keep it from turning as the bit rotates. Start the bit slowly for more control.
SYMBOL MEANING SAFETY ALERT SYMBOL: Indicates danger, warning, or caution. Applying too much pressure will: When drilling large holes in metal, start with a small bit, then finish with a larger bit. 0000027877 00000 n
0000001196 00000 n
Removing the battery pack will prevent accidental starting that could cause serious personal injury. Note: Rotate chuck body in the direction of the arrow marked RELEASE to loosen chuck jaws. endstream endobj 85 0 obj<>stream 19.
WARNING:Do not allow familiarity with this product to make you careless. 0000002635 00000 n WARNING:Always wear eye protection with side shields marked to comply with ANSI Z87.1. 21.
not related to a potential injury (e.g.
Important Safety Instructions For Charger RULES FOR SAFE OPERATION The purpose of safety symbols is to attract your attention to possible dangers. 22. when working outdoors. Be sure to provide all pertinent facts when you call or visit.
Revolutions, strokes, surface speed, orbits, etc., per minute. HtUr1+@xWlK\jv=jhKK!TN|=XbRCQp\3o-&F0|ha )CC~l'bdMFTd:s,S,ej$ezA43H 1C]p\b(hwR2'k0v8E62| % 8A#M9fu~_S w?>E?WF$+SCyw Y mZumJP4J=21] Qv%mS?xeIL&|)65[aB*5`>VHHV=${TA:jlmQ9()&3K f q?Nx!F::p{u$i<8(}NB6)G2?+4?y/ s
YC'odY40X.}0=g ! Box 1288, Anderson, SC 29622 Phone 1-800-525-2579www.ryobitools.com, RYOBI PRT100 Rotary Tool DANGER: If you are changing an accessory immediately after use, be careful not to, ELITE Power AirFryer STEP 1 Remove Outer Basket. %PDF-1.6 % startxref However, like all batteries, they will eventually wear out.
256 0 obj <>stream
17. 0000021452 00000 n Open or close the chuck jaws until the opening is slightly larger than the bit size you intend to use.
To remove bits, lock the switch trigger and open the chuck jaws. 225 0 obj <> endobj Any such alteration or modification is misused and could result in a hazardous condition leading to possible serious personal injury. Position the selector to the right of the switch trigger to reverse the direction.NOTE: The tool will not run unless the direction of the rotary selector is pushed fully to the left or right.NOTICE: To prevent gear damage, always allow the collet to come to a complete stop before changing the direction of rotation.WARNING: Battery tools are always in operating condition.
OPERATION WARNING: Always wear safety goggles or safety glasses with side shields when operating tool. Failure to do so could cause serious personal injury. DRILL-DRIVER / IMPACT DRIVER SAFETY WARNINGS, RYOBI HP Brushless 1/4 In. hUmo0+e'AA4jHPVia*&O. If you must drive a screw where the hidden wire may be present, always hold the tool by insulatedgripping surfaces (handle) when performing the operationto prevent a shock to the operator. Do not disassemble your drill and attempt to replace the batteries. 0000043650 00000 n Use the battery only with the charger listed.
Contact with a live wire will make exposed metal parts of the tool live and possibly shock the operator. i need a manuel for ryobi ems1825scl drop saw require manual for table saw Ryobi SB254 Copyright 2020 Inmar-OIQ, LLC All Rights Reserved. 0000038632 00000 n
0 DRILL HANDLE 37 1.8 This product contains nickel-cadmium battery.
<<1D06BD607EB08C4FB625CB395CC6E8D0>]>> Local, state, or federal laws may N i Cd prohibit disposal of Nickel-Cadmium 00 .822.88 batteries in ordinary trash. Wear ear protectors with impact drivers. Cordless Drill/Driver Kit.
If the tool still does not resume operation, remove and reinsert the battery. Do not insert the drill bit into the chuck jaws at an angle, then tighten. For more information on battery recycling call 1-800-8 BATTERY. Local, state or federal laws may prohibit the disposal of batteries in ordinary trash. 1/2 in., KeylessNo Load Speed .. Low 0-450/min (RPM), High 0-1,700/min (RPM)Clutch ..24 positions. To resume operation, allow the battery and tool to cool and then squeeze the trigger.INSTALLING/REMOVING BELT HOOK OR BIT HOLDER (NOT INCLUDED)See Figure 1, page 11 (PSBDD01).See Figure 1, page 12 (PSBID01).The belt hook and bit holder are interchangeable. OPERATION CHUCK REMOVAL MALLET KEYLESS CHUCK 9 CHUCK JAWS 1 3 5 7 See Figures 11, 12, and 13.
Insert the battery pack into the product as shown. OPERATION KEYLESS CHUCK RELEASE (UNLOCK) See Figure 4. 0000003909 00000 n 0000002033 00000 n 3 5 7 9 OWNERS OPERATOR'S MANUAL CORDLESS DRILL-DRIVER MODEL NO. Never operate at a higher speed than the maximum speed rating of the drill bit. At higher speeds, the bit is likely to bend if allowed to rotate freely without contacting the workpiece, resulting in personal injury. When the switch trigger is released, the chuck stops turning.WOOD AND METAL DRILLINGFor maximum performance, use high-speed steel bits for wood or metal drilling. Use light oil on the drill bit to keep it from overheating. Do not use any attachments or accessories not recommended by the manufacturer of this product.
To loosen: grasp and hold the collar of the chuck with one hand, while rotating chuck body with your other hand.
If not prepared, this loss of control can result in possible serious injury.
When these situations occur, the drill has a tendency to grab and kick opposite to the direction of rotation and could cause a loss of control when breaking through material. Do not force the tool.HIGH-TEMPERATURE PROTECTIONLi-ion battery packs are equipped with a high-temperature protection feature that automatically deactivates the tool when it is overheated. A Torque adjustment ringB Two-speed gear train (high-low)C Direction of rotation selector (forward / reverse / center lock)D Bit holder (not included) [porte-embout (non inclus),E Led lightF Variable speed switch triggerG Keyless chuckH Belt hook (not included), A Belt hook (not included)B Bit storage (not included)C Screw, A Direction of rotation selector (forward/ reverse/center lock)B Switch triggerC ReverseD Forward, A LatchB Depress latches to release battery pack, RIGHT/CORRECT/FORMA CORRECTAA Keyless chuckB OpenC Chuck jawsD Drill bitE Close, WRONG/INCORRECT/ ORMA INCORRECTA To increase torqueB High (2) speedC Two-speed gear trainD Low (1) speedE Adjusting ringF To decrease torque, PSBID01A ColletB LED lightC Switch triggerD Direction of rotation selector center lock)E Lanyard loopF Belt hook (not included), A BitB To eject bitC To insert bitD Locking grooveE ColletA LED light, RIGHT / CORRECT / FORMA CORRECTAWRONG / INCORRECT / FORMA INCORRECT, OPERATORS MANUALMANUEL DUTILISATION / MANUAL DEL OPERADORPSBDD01 DRILL-DRIVERTo request service, purchase replacement parts,locate an Authorized Service Center or obtain Customer or Technical Support:Visit www.ryobitools.com or call 1-800-525-2579If any parts or accessories are damaged or missing, do not return this product to the store.Call 1-800-525-2579 for immediate service.Please obtain your model and serial number from the product data plate.This product is covered under a 3-year limited warranty. PROTECT YOUR HEARING. The chuck sleeve could slip in your hand, or your0 hand could slip and come in contact with the rotating drill bit. (254 mm) DRILL PRESS OPERATOR'S MANUAL DP101, Ryobi drill press operation manual DP102L, Ryobi Technologies Inc. HP61 THANK YOU FOR BUYING A RYOBI CORDLESS DRILL-DRIVER.
({vp{km2~:+tuR^rc_qzzvPLB?=U| y;
Refer to "Charging Your Drill-Driver" for normal recharging of batteries.
There may be some play in the installed bit; this is normal. OWNER'S OPERATOR'S MANUAL CORDLESS DRILL-DRIVER MODEL NO. Everyday eyeglasses have only impact-resistant lenses; they are NOT safety glasses. Maintain a speed and pressure which allows cutting without overheating the bit. 0000003082 00000 n z/2^gS| NB-rgP#ZuHyRzc^%r5 9x&H_i|}:mixCCXd|/}%m69Cgj|7q8,g{. The batteries in this tool have been designed to provide maximum trouble-free life. if not avoided, may result in minor or moderate injury.
0000028233 00000 n
Bits can bend causing breakage or loss of control, resulting in personal injury.
0000005738 00000 n
Use low (1) speed for high torque applications and high (2) speed for fast drilling or driving applications. trailer Tap the hex key wrench sharply with a mallet in a clockwise direction.
Always wear eye protection with side shields marked to comply with ANSI Z87.1. Wear protective hair covering to contain long hair and keep it from being drawn into nearby air vents. Wear a face mask or dust mask if operation is dusty. With the nose of the tool pointed away from you, pull the collet away from the driver.
To uninstall, remove the screw and then belt hook or bit holder. Pull Easy-Grip Handle straight out. WARNING:Do not drive a screw where there is likely to be hidden wiring behind the surface. TWO-SPEED GEAR TRAINSee Figure 6, page 11 (PSBDD01). WARNING:Do not attempt to modify this product or create accessories or attachments not recommended for use with this product. USING THE IMPACT DRIVERSee Figures 6 7, page 12 (PSBID01).NOTICE:The impact driver is not designed to be used as a drill. 0000028758 00000 n Always start drilling at low speed and with the bit tip in contact with the workpiece.
CAUTION: Carefully read through this entire operator, Pay close attention to the Rules for Safe Operation, W. and only for what it is intended, you will enjoy years of safe, reliable service. The bit provided with the drill can be placed in the storage area, located on the rear base of the drill. The safety warnings do not by themselves eliminate any danger.
That extension cord is properly wired and in good electrical condition; and c. OPERATION SPECIFICATIONS: Switch Two-Speed No Load Speed 300/500 RPM Clutch 24 Positions Charger Input 120V, 60 Hz, AC only Charge Rate 3-6 Hours 7 DC Motor 6.0V BIT STORAGE AREA 5 Motor 1 3 3/8 in. Hammer Drill Operator's Manual, Ryobi 10 in. If the drill is not in use, the time-out feature will cause the light to start fading and then shut off.
Home RYOBI RYOBI Drill-Drive Owners Manual, OPERATORS MANUALREGISTER YOUR TOOLShttp://register.ryobitools.com1-800-525-2579. 125 0 obj<>stream Push the bit into the collet until it clicks into place. Rotate the chuck body with your other hand. xref DIRECTION OF ROTATION SELECTOR (FORWARD / REVERSE / CENTER LOCK)See Figure 2, page 11 (PSBDD01).See Figure 2, page 12 (PSBID01).Set the direction of the rotation selector in the OFF (center lock) position to lock the switch trigger and help prevent accidental starting when not in use.Position the direction of the rotation selector to the left of the switch trigger for forwarding operation.
0000024689 00000 n
This could cause the drill bit to be thrown from the drill, resulting in possible serious personal injury or damage to the chuck. 0000006917 00000 n
OPERATOR'S MANUAL CORDLESS DRILL-DRIVER CTH1202K2/CTH1442K2/CTH1802, Ryobi Technologies Inc. Electric Drill D130VR OPERATING MANUAL, Ryobi Technologies Inc. Electric Drill D28VSR OPERATING MANUAL, RYOBI TECHNOLOGIES 3/8 in.
~\\u\./2qVO_3FO_[=%ztNC .P3sxI} This will prevent the drill bit from slipping off center as the hole is started. (13 mm) three speed cordless hammer drill (9 pages), Cordless drill driver / impact drill driver (91 pages), Manual will be automatically added to "My Manuals", Drill Ryobi Autoshift CDA1802 Owner's Operating Manual, Drill Ryobi CDI-1443? The arrows on the chuck indicate which direction to rotate the chuck body in order to GRIP (tighten) or RELEASE (unlock) the drill bit.
DRILL D41 OPERATOR'S MANUAL, RYOBI operator's manual DRILL-DRIVER D45C, Ryobi 3/8 in. Increase the speed as the drill bit bites into the material. Lock the switch when not in use or carrying at your side, when installing or removing the battery pack, and when installing or removing bits.VARIABLE SPEED SWITCH TRIGGERSee Figure 2, page 11 (PSBDD01).See Figure 2, page 12 (PSBID01).The variable speed switch trigger delivers higher speed with increased trigger pressure and lower speed with decreased trigger pressure.To turn the tool ON, depress the switch trigger. Loosen the chuck jaws from drill bit. If any parts are damaged or missing, please call 1-800-525-2579 for assistance. To reset the tool, release the trigger and resume operation. 11. ALWAYS WEAR SAFETY GLASSES. 7 0 obj 0000026845 00000 n 0000006470 00000 n
To install bits, remove the battery pack from the tool. %PDF-1.4 0000027537 00000 n Rotate the chuck sleeve to close and tighten the chuck jaws. 81 0 obj <> endobj Use of a product that is not properly and completely assembled or with damaged or missing parts could result in serious personal injury. Comment document.getElementById("comment").setAttribute("id","ab5409419aafaafd3902fe57cba9ca0b");document.getElementById("afe6277d1c").setAttribute("id","comment"); Save my name, email, and website in this browser for the next time I comment.
0000043282 00000 n
Copyright 1995-2022 eBay Inc. All Rights Reserved.
Contact with a live wire will make exposed metal parts of the tool live and possibly shock the operator. The chuck must be removed in order to use some accessories. Indicates a hazardous situation, which, if not avoided, could result in death or serious injury. c (106 pages), 18 volt compact hammer drill driver (12 pages), Cordless drill driver / impact drill driver (9 pages), 1/2 in. Do not use the impact driver as a drill.
The impact driver is not designed to be used as a drill. You can also check our web site at www.ryobi.
WARNING:Do not hold the chuck sleeve with one hand and use the power of the drill to tighten the chuck jaws on the drill bit. WARNING:Make sure the bit is secured in the collet before using the impact driver.
Consult your local waste authority for information regarding available recycling and/or disposal options. 0000038017 00000 n Indicates a hazardous situation, that.
0000032324 00000 n OPERATION REMOVING BITS SCREWDRIVING 9 TO DECREASE TORQUE 3 5 7 TORQUE ADJUSTMENT RING 1 See Figure 5. 0000001421 00000 n <> %%EOF 0000032657 00000 n % To turn it OFF, release the switch trigger and allow the collet or chuck to come to a complete stop.NOTE: A whistling or ringing noise coming from the switch during use is a normal part of the switch function.NOTE: Running at low speeds under constant usage may cause the tool to become overheated. endstream endobj 226 0 obj <>>>/Metadata 98 0 R/Names 245 0 R/Pages 219 0 R/Type/Catalog>> endobj 227 0 obj <>/ExtGState<>/Font<>/ProcSet[/PDF/Text/ImageC]/XObject<>>>/Rotate 0/Type/Page>> endobj 228 0 obj <>stream RULES FOR SAFE OPERATION (Continued) 7. 0-2,900/min (RPM)Collet .. 1/4 in.Impacts per minute 0-3,800/min (IPM)Torque .0-1,700 in.lbs. RULES FOR SAFE OPERATION (Continued) 9.
0000039193 00000 n 0000003483 00000 n The following signal words and meanings are intended to explain the levels of risk associated with this product. Indicates a potential personal injury hazard. TABLE OF CONTENTS Table Of Contents/Typical Applications. Proof of purchase is required.MODEL NUMBER* _______________ SERIAL NUMBER _____________*Model number on a product may have additional letters at the end. APPLICATIONSYou may use this tool for the purposes listed below:PSBDD01Drilling and driving screws in all types of wood products (lumber, plywood, paneling, composition board, and hardboard), ceramics, plastics, fiberglass, laminates, metals; Driving screws into wood and drywall with screwdriver bitsPSBID01Driving and removing screws/lag bolts; tightening screws, nuts, and boltsOVERLOAD PROTECTIONWhen the tool is forced or overloaded, the Li-ion battery pack will automatically shut off the tool.
- Cyber Security Placement Jobs
- Suspension Trainer Vs Resistance Bands
- Toddler Hey Dudes Journeys
- Pukka Three Cinnamon Tea Benefits
- Cinnamon Dhonveli Maldives Tui
- Bahia Principe Grand Bavaro Punta Cana
- Master Of Information Systems Management Macquarie University
- Fruit Print Trend 2022
- Personalised Infinity Necklace Gold
- Centric Parts Brake Drum
- Camber Industrial Sweatshirt
- Studio D Artisan Loopwheel