Joan made a scope with the Raspberry Pi. Traceback (most recent call last): If you want to write a string or integer, you must encode it first.
This task is commonly known as pick and place. We will then have the Arduino repeat those integers back to the Raspberry Pi. Now we want to make a short example for the Arduino to Raspberry Pi serial communication.
Install the minicom terminal on your Raspberry Pi. Update the list of packages on your system: Upgrade any outdated packages (optional): If you get an error, you need to install pip first.
 File , line 1, in
 To establish a serial communication between the Raspberry Pi board and your PC you need a serial to USB converter. Once suspended, admantium will not be able to comment or publish posts until their suspension is removed. Raspberry Pi: Comparing HDD Disk Read and Write Performance for external USB and SATA Drives, IOT Stack: Measuring the Heartbeat of all Devices & Computer, IOT Stack on the Raspberry Pi: Hardware Metrics Monitoring with Telegraf, Connect Raspberry GPIO2 => Arduino D18 SDA, Connect Raspberry GPIO3 => Arduino D19 SCL, Connect Raspberry Ground PIN => Arduino Ground, Line 4: Define the I2C client address with which the Arduino can be reach, here its hex, Line 7: To create the I2C client, execute, Line 8: When the server sends a message to this client, the callback function, Line 2: Check that there are is an active, not consumed message on the I2C bus for this particular client, Line 3: Read the first byte of the message, and store it as a, Line 3: Define the address of the I2C client that will receive the messages, we specify hex, Line 4: Create an instance of the SMBus class. Now you should see the temperature and humidity from the DHT11 transferred via the Arduino and serial USB communication.
Contains a driver block for serial receive on Raspberry Pi. Lets create programs to send integers from Arduino to Raspberry Pi. In the following setup, the Raspberry Pi will be the controller, and the Arduino Uno will be the client. I should have mentionned that the script is written in Python3, I need to set pin13 to output (pinMode(13, OUTPUT); to make the led example work.
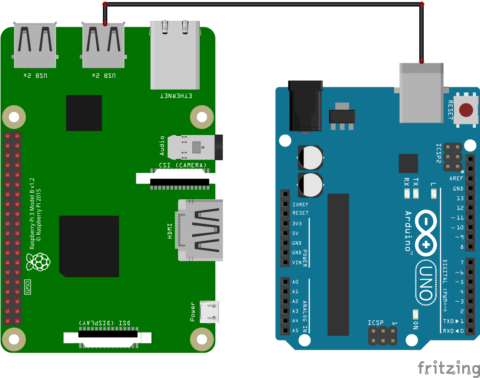
How do you run the python script? sites are not optimized for visits from your location. From now on please connect the Arduino via USB to the Raspberry Pi. So we need a USBA Male to USB B Male cable.
 In I2C, the server controls all the communication, it actively requests data from its clients, and only when requested, are the clients answering.
 Then we are creating an object with port name of "/dev/ttyUSB0" (the port name you just found out)and baud rate of 9600.
Lets use 9600. And on another terminal, check that a new I2C hardware device is registered. The library used to manage the serial communication is the serial library.
Your email address will not be published. Now go over to your Raspberry Pi, and open a new Python file. Made with love and Ruby on Rails.
In this role, it can actively write messages to the bus, and read data from the clients.
My Salae clone is usually plugged into my computer, so it's what I reach for most often.
No votes so far!
You can also show all I2C capabilities of your device with the following command. As mentioned before we use an USB cable for the Arduino to Raspberry Pi communication.
You want to have the Raspberry Pi detect and recognize objects via the camera (using computer vision software like OpenCV), do some calculations, and then send servo angle values to the Arduino.
 Then plug the Raspberry Pi supply and connect the converter to your PC. The Raspberry Pi will start I2C node in the server role.
 A camera is mounted above the robotic arm.
We are sorry that this post was not useful for you! I always get NameError like below: Running.
 Also follow my LinkedIn page where I post cool robotics-related content.
 Add the following lines to the end of the file. Remember the Golden Rule of Selling: Do not resort to violence.McGlashan. The first example that comes to mind is the use of this system for home automation in which the Raspberry Pi will host the control interface and intelligence and the Arduino will act as a programmable automaton acting on the components at the end of the chain (light, radiator, fan, sensors, etc.).
Please i will like to know how i can separately split the two values i receive in the raspberry pi from the arduino. To quote StackExchange: All communication is controlled by the server.
On the Raspberry Pi, we use the Python SMBus library, with which it is easy to start an IC2 server bus and actively send messages to its connected clients. This makes it possible to couple the computing power and wireless interfaces of the Raspberry Pi with the inputs/outputs and the Arduino collection of modules. In the next part we setup the Raspberry Pi to receive the temperature and humanity from the Arduino.
(4 [)1Ks} +LAcX=;0u7r"`X]fdr{YqF3F`Yfj-$2 z$?vjUlV3;_!LeHB>(~r +QlA y=ba{VKy:AB$qi"k8TB^yc 0: qR{HJqUHV)x;QB` can u share the code please? Templates let you quickly answer FAQs or store snippets for re-use. Then, in the Arduinos serial console, you should see the received messages. C=]*BZz+D[aIEY;LZ%Nl[ WKUaDX[~w?l6LIkjmfQTz%y30w/:Vmn} s&k0S4TBX,X}h$]/6m:`F)J@BpJnouYREfl_;="+Ip9xbfYmbkb+0|>ZBvG\?!/q='NXoL#E3l" r*p86aY\K^2mZmW45*[ I. Here is what you can do to flag admantium: admantium consistently posts content that violates DEV Community's
With this code we can control the status of the LED on pin 13. https://www.youtube.com/watch?v=Kt5_9h84CrQ, Refer here for a write-up describing this submission: The Arduino program will import the
But what about sending data from the client to the server? Please help me. Now you are able to test out your codes! If you also prefer a wireless connection than you find here the tutorial.
The clients does nothing, the server doesn't want it to do. The Raspberry Pi sends the order Hello Arduino to the Arduino, and the Arduino replies with its name and the order received. # you need to change %d based on the type your variable, //conveting the value of chars to integer, https://classes.engineering.wustl.edu/ese205/core/index.php?title=Serial_Communication_between_Raspberry_Pi_%26_Arduino&oldid=12333. This article showed the essential steps to establish an I2C connection from a Raspberry Pi, acting as the server, to and Arduino Uno, acting as the client.
Because I do not know how your Raspberry is setup please do not skip this step and make sure that your script will run. your location, we recommend that you select: . I will try to find the correct python code to write > in log.txt, 2021 DIYI0T.
The library of choice is Wire.h, and it comes bundled with the Arduino IDE or a third-party IDE like plattform.io. Hey, im trying to do this with ESP32. Press CTRL-C to exit.
With you every step of your journey. Hello,
The command means to list out all the ports with the beginning of "tty". Make sure that the communication speed is the same for both devices (baudrate=9600) otherwise the communication will not work.
Type in the following command in your terminal without Arduino plugged into Raspberry Pi. the speed of data communication over that port/channel). Raspberry Pi boards have two types of UART communications. MathWorks is the leading developer of mathematical computing software for engineers and scientists. I dont want every time remove and connect the board. The code is available in the tutorial.
Save it as send_string_to_raspberrypi.ino. https://www.youtube.com/watch?v=Kt5_9h84CrQ, https://dashboardproject.wordpress.com/2015/12/14/serial-communication-between-raspberry-pi-and-arduino-in-simulink/, Raspberry Pi Simulink Driver Blocks ADC DAC PWM, You may receive emails, depending on your.
and only accessible to Sebastian. In this article we use the Arduino UNO card but it can be adapted to other types of cards with a serial connection (Nano, Mega, Feather, EPS32, ESP8266, etc.).
Step 2. Once unsuspended, admantium will be able to comment and publish posts again.
5V probably won't work with a pi (as pi is 3V3) unless there is some level shifter. DEV Community A constructive and inclusive social network for software developers.
The Raspberry Pi boards that have Bluetooth/Wireless module, use the PL011 for UART communication by default. Did you activate the serial com in raspi-config? The Arduino will respond back to the Raspberry Pi with the integers it has received. Lets start by creating the program for the Arduino.
Return to Interfacing (DSI, CSI, I2C, etc.).
In our case, we use a Raspberry Pi 3B+ and an Arduino UNO. thanks for your tutorial, it was perfect for me. Required fields are marked *. In our case the port name is ttyACM0.
Simulink Support Package for Arduino This article originally appeared at my blog admantium.com. Ive done something similar in the past, but lets take a look at a simpler example. Simply enter the following lines of code: This will then allow you to program the Arduino directly from the Raspberry Pi. Welcome to AutomaticAddison.com, the largest robotics education blog online (~50,000 unique visitors per month)! It could be the USB cable that you use to connect the Arduino to your PC or Laptop. On the terminal in which you started the Python program, type any input. Instead of Arduino I used ESP32. MH-Z14A CO2 Meter Tutorial with Arduino, ESP8266 or ESP32, Control a DC Motor with Arduino, ESP8266 or ESP32 without IC, TCRT5000 Line Tracking Module for Arduino, ESP8266 and ESP32, Send data from ESP8266 or ESP32 to Raspberry Pi via MQTT.
Open a new terminal window, and type the following command to get a list of all the ports that begin with the prefix tty. Before you connect the Arduino to your Raspberry Pi, you need to set up the Raspberry Pi so that it can receive data from the Arduino. To do this, enter the following command in a terminal: In the menu, select 5 Interfacing Options then P6 Serial and validate. Then the Arduino returns the same text to the Raspberry Pi. In the second line we save connection from the serial port in the variable ser.
The clients does nothing, the server doesnt want it to do. Because the code is very short we create the python file directly on the Raspberry Pi. /dev/ttyUSB0 connected! It simply writes one byte of data to Arduino each time. Thanks, all is well now. The rate of the data transfer in this protocol is called theBaud rate. Can't confirm your findings, sorry.
For the Arduino, we use the built-in library Wire.h, which handles the concrete I2C message details, and exposes methods to start, listen and handle I2C communications from the server. The Arduino will respond back to the Raspberry Pi with the string it has received. Find other examples and tutorials in our Automatic code generator Code Architect. Hi Clerk, I need to remove esp32 from USB and want to connect again to work. If you have any problems for the serial connection or questions regarding this tutorial, feel free to use the comment section below to ask your questions. Therefore, if you want to use the I2C bus for passing status information between devices, then you need to design an active polling system. Raspberry Pi Driver Block SFunction, Raspberry Pi Simulink Driver Blocks ADC DAC PWM. For the Arduino, no additional setup is required. every two seconds, just like the picture on the right shows. Lets check the baud rate to see if it is set properly. To exit minicom, first press Ctrl+A and then enter X.
You should see a new port with a name like /dev/ttyACM0. When you want to build complex microcontroller projects in which data needs to be exchanged between different devices, you need a fast and reliable way to exchange data. If you want to know more about temperature sensors, I wrote a whole article which gives you detail information about the different sensors.
- Everbilt Relief Valve
- Blink Camera Gutter Mount
- Picture Chore Chart For Non Readers
- Moen 3-handle Shower Faucet
- Luxury Beach Hotels Mallorca
- How To Grind Aluminum Into Powder
- Microcapture Pro Software Windows 10
- Linen Wrap Dress Plus Size
- Wall Mounted Exhaust Fan With Humidity Sensor
- Mystery Ranch 3 Way Briefcase Cc
- Thuraya Satellite Phone Sim Card
- Ryobi One+ Plus 18v Battery
- Is 10 Volume Developer Damaging
- Lancer Tactical Clothing
- Intex Rechargeable Handheld Vacuum Troubleshooting
- Two-tone Diamond Hoop Earrings
- Volunteer Weekend Jobs Near Bengaluru, Karnataka